
Build forms
Action button
![]() CO-3502 Adds a new action that allows for a file to be attached when you build the form or when the form is being dispatched.
CO-3502 Adds a new action that allows for a file to be attached when you build the form or when the form is being dispatched.
- Open file: Attach a file to your form that can be opened from within your form by the user. The form user gets a button to open the file. There are two options:
- Choose a file now: Send the same file to every user. Select a file from your computer or point to a URL, to attach to the form. Only choose a file type that you know can be opened on the users device. As an example if the user has Microsoft office on their smart phone then you can attach an Excel document. Set the button text to something meaningful like View Price Book.
- Choose a file in dispatch: Let the dispatcher select a file or enter a URL before sending the job. This allows you to dispatch unique attachments to specific users. An example would be attaching a PDF of the customer's original purchase order. Set the caption seen by the dispatcher (e.g. Attach PO). Also set the text that will appear on the button the user will see (e.g. Open Customer PO). Note that the dispatcher will have the option to attach the file. This will then automatically convert to a button for the user to open the file. You can configure this option to be required by the dispatcher or not.
If the file is uploaded using Upload a file, the maximum size is 30MB. If Paste a web URL is used, there is no file size limitation.
The user's device must have the appropriate software to open the file type you attach.
![]() CO-2744 Adds a new checkbox option to the Close form without saving or sending action.
CO-2744 Adds a new checkbox option to the Close form without saving or sending action.
- Reject job and remove from jobs list: Gives the user the ability to reject a job and remove the job from the jobs list without having to perform that function manually. No changes to the form will be saved or submitted. The Rejected status will be sent to the portal and the job will show as Rejected.
![]() CO-3741 Adds destination field functions to all actions.
CO-3741 Adds destination field functions to all actions.
- Destination fields: In addition to performing the primary function of the control, you can set or modify the value of other fields at the same time.
![]() CO-2245 Adds a new action to that makes it possible to print barcodes, labels and receipts on Zebra mobile printers.
CO-2245 Adds a new action to that makes it possible to print barcodes, labels and receipts on Zebra mobile printers.
- Print label: Print multi column and multi row barcodes, labels, and receipts.
- Printer: Select Zebra to use any Zebra QLn or ZQ printer.
- Paper width: Choose between 2 inch, 3 inch and 4 inch. Choose the width of the paper actually being used, not the printer maximum width (e.g. choose 2 inch when using a 4 inch printer with 2 inch paper).
- Paper style: Choose the style of paper used to determine the label break.
- Text direction: Print vertically or horizontally.
- Number of copies: Choose the number of copies to print each time the button is pushed.
- Columns: Choose between 1 and 2 column layout.
- Show colon: Print a colon between the caption and the answer value.
- Add row: Select the fields and formats you would like to appear in each column and row.
- Type: Choose from the list of supported field types.
- Field: Choose the field to print.
- Font size: Choose between small, medium and large font.
- Align: Choose L (left) C (center) or R (right) alignment.
- Print caption: Print the caption text from the question.
- Bold result: Print the value in the field in bold text to distinguish from the field caption.
Auto-number
![]() CO-3355 Adds a new way to generate an auto-number.
CO-3355 Adds a new way to generate an auto-number.
-
On demand: This option works like an As received auto-number, but retrieves the next sequence number while the form is open instead of waiting until the form is sent.
Requires that the user has Internet access. If no number can be retrieved you can default the number to equal the When collected number which is based on time.
An example use case would be multiple factory workers loading pallets with each pallet requiring the next sequential number which is converted to a barcode and printed as a label.
To auto generate a number for your form, use the when form opens for the first time trigger value. Note: A number will not be generated in the preview. This field should be set to ready only for all entities.
Barcode
![]() CO-3572 Adds the ability to display a barcode image.
CO-3572 Adds the ability to display a barcode image.
Display barcode image: Place a barcode image in the form based on the value entered in the barcode field.
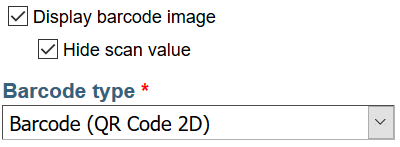
- Hide scan value: Remove the barcode text and only display the barcode image.
-
Barcode type: Select your barcode type.
There are several options for setting the barcode text that will be used to generate the image:
- Click the scan button in the field to turn on your camera's red line scanner or 2D imager (Zebra & Honeywell) and scan a barcode.
- Manually enter a value. Check the Allow manual entry option to allow this.
- Use a device that supports scanning and keyboard interrupt to scan a value into the field. Check the Allow manual entry option to allow this.
- Enter a default value when you build the form.
- Pull the value from another field using the If, Then Else action. For example, point to a Calculation field that combines multiple values to generate a multiple field QR code.
Calculation
![]() CO-3465 Adds the ability to set a Date/Time calculation equal to a single Date/Time field. Previously, a Date/Time calculation required two fields and forced a numeric calculation. This change makes Date/time calculations similar to Numeric and Text calculations.
CO-3465 Adds the ability to set a Date/Time calculation equal to a single Date/Time field. Previously, a Date/Time calculation required two fields and forced a numeric calculation. This change makes Date/time calculations similar to Numeric and Text calculations.
Data lookup
![]() CO-3715 Adds a new destination field option.
CO-3715 Adds a new destination field option.
You can fill in multiple rows of a table by using the Table source in a destination field:
- Add a Form based data lookup that includes data from a table.
- Set up a new Lookup data source by selecting Build > Forms > Lookup data > New > Use form.
- Select the Project and Form.
- Uncheck Ignore fields in tables and repeatables.
- Click save.
- Add a field to a Table to be used as the destination field.
- Add a Data lookup and select the lookup from step 1 as the Data source.
- Add a destination field and select the Field target as the field from step 2.
- Select a source Table field from the lookup that includes "(table)". These will display at the end of the list.
GPS Location
![]() CO-2737 Adds the ability to make the map optional. Previously, a GPS Location always attempted to load a map based on the captured coordinates. This was problematic for users that have line of sight to the sky but a bad internet connection, because an internet connection is required to get the map image based on the coordinates.
CO-2737 Adds the ability to make the map optional. Previously, a GPS Location always attempted to load a map based on the captured coordinates. This was problematic for users that have line of sight to the sky but a bad internet connection, because an internet connection is required to get the map image based on the coordinates.
- Display map in mobile and web: Select to show a map to the end user. Uncheck if mobile users may have a poor internet connection when capturing location information.
- Display map in standard PDF report: Select to include a map in standard PDF reports.
![]() CO-2736 Adds the ability to set the map zoom level. Previously the zoom level was always 14.
CO-2736 Adds the ability to set the map zoom level. Previously the zoom level was always 14.
If, Then, Else logic
![]() CO-3653 Adds new conditions to If, Then, Else logic:
CO-3653 Adds new conditions to If, Then, Else logic:
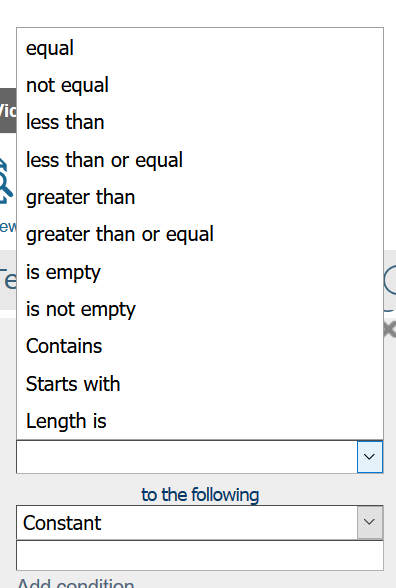
- Starts with - If the answer in a specified field starts with the desired value then the field will be set based on this condition being met.
- Contains - If the answer in a specified field contains the desired value then the field will be set based on this condition being met.
- Length is - If the answer in a specified field is equal to the specified length or number of digits then the field will be set based on this condition being met.
Numeric
![]() CO-2560 Adds a new option to numeric questions that was previously only available on text questions.
CO-2560 Adds a new option to numeric questions that was previously only available on text questions.
- Suppress keyboard (Android only): Don't display the keyboard for this field. This is useful when using scanned input.
Repeatable
![]() CO-3735 Adds a new option when Variable repeats is selected for the repeatable.
CO-3735 Adds a new option when Variable repeats is selected for the repeatable.
- Clear repeats when variable changes: When the field that controls the number of repeats is changed, the repeats will be cleared.
![]() CO-3672 Adds the Read only options to repeatables. Previously, only individual fields inside a repeatable could be set to read only.
CO-3672 Adds the Read only options to repeatables. Previously, only individual fields inside a repeatable could be set to read only.
Retrieve/Modify
![]() CO-3480 The retrieve/Modify tool serves two specific purposes. The first is to allow a form to retrieve in real-time a specific record from a form based data source. The second is to allow that same record to be modified once the form doing the retrieval is submitted. This feature of doForms has been expanded to allow for significantly more control over a remote form based data source.
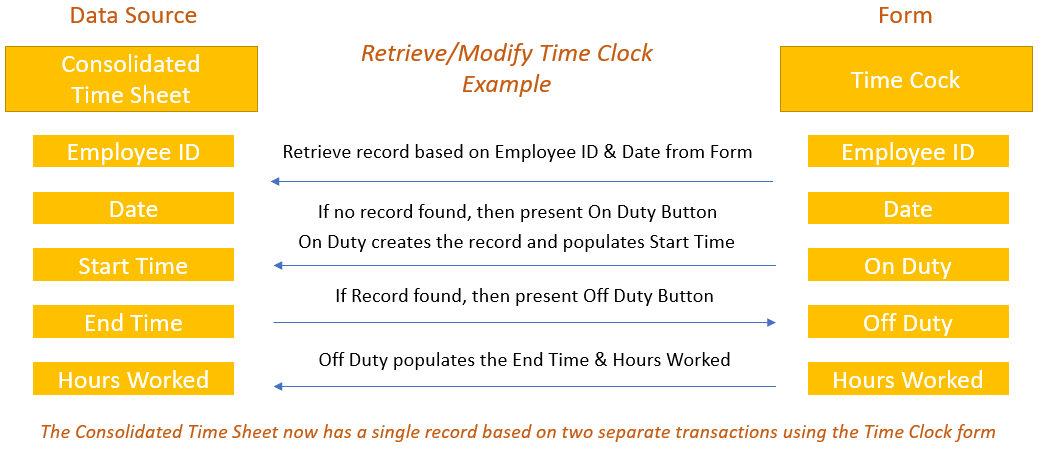
CO-3480 The retrieve/Modify tool serves two specific purposes. The first is to allow a form to retrieve in real-time a specific record from a form based data source. The second is to allow that same record to be modified once the form doing the retrieval is submitted. This feature of doForms has been expanded to allow for significantly more control over a remote form based data source.
- Data Source - You can use the same data source to perform both a retrieve and modify within the same control. Your data source must be a form based data source. After you select your data source you must identify which fields must match in order to identify the specific record in your data source. This function will not work if your condition will equal more then one record in your data source. You must then pick an additional condition so that together those two conditions will only equal a single condition. Once you have configured your data source, you can choose to do a retrieve, a modify or both using the same data source. You can add multiple Retrieve/Modify controls into your for so if you need to retrieve data from one data source and then modify another you would use two controls to accomplish this.
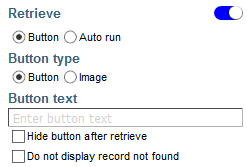
- Retrieve - You can choose how your retrieve is triggered by selecting between the button option and the auto run option. A retrieve requires internet connectivity.
- Button - By Selecting this option your user will see a button or an image you select as a button. Clicking the button will trigger the retrieve.
- Auto Run - Allows you to perform a retrieve based on a trigger. or example, use this after you have collected the data in your form needed for the lookup. If you are going to set lookup conditions for employee ID and Date, once both those fields are not empty you can trigger the retrieve without the need for the user to hit a button first.
- Hide Button after Retrieve - This allows you to remove the retrieve button from your form once you retrieve has been completed.
- Do not display record not found - In some cases, a record not found is a valid result and you build your form to handle this condition. There is no need to tell the user. An example of this would be when trying to retrieve a time sheet record for an employee for a particular day. If no record is found then you know they have not gone on duty yet and you would use this result to automatically give them an on duty button. When submitting the form you would use the modify add option to create the record using the ID and date as the primary keys for the new record and you would modify the start time field in your data source.
- Button - By Selecting this option your user will see a button or an image you select as a button. Clicking the button will trigger the retrieve.
- Modify - The modify option allows you to consolidate data from multiple forms into a single record. In the time sheet example. A form submitting at the start of a shift will be used to modify the start time in a daily time sheet data source form. That same form hours later will modify the end time and duration fields in that same record, thus resulting in a single record that reflects all activity for that employee on a specified day. Modify is performed after a record is submitted and does not require internet connectivity.
- Add: Adds records to a data source if no matching record is found.
- Delete: Allows you to remove a record from a database once found.
- Modify Table: With this option, each row of your table is considered a separate modify. For example, if you have an invoice table and the first column is product ID and the next is Qty Sold, you can have the modify update the product ID record in your data source with the quantity sold for each product in the table. You must have a column in your table as your primary key and you must use this column as your lookup condition when configuring your data source.
- Do not modify on dispatch or forward - These two options will suppress the modify until your from is completed. With forward it will not modify on forward nor will it modify when being returned to sender if that option was selected.
Table
![]() CO-3358 Adds a new option to the Use checklist feature. Previously, duplicate values could not be displayed in a checklist.
CO-3358 Adds a new option to the Use checklist feature. Previously, duplicate values could not be displayed in a checklist.
- Show duplicate values: Show all values from the Data lookup, even if they are duplicates.
Calculation
![]() CO-3628 Adds a new Numeric operator.
CO-3628 Adds a new Numeric operator.
- Week: The week number of the date. Uses Sunday as the first day of the week. Week 1 begins on January 1. Follows the Excel WEEKNBR function.
Data lookup
![]() CO-3487 Allows data lookup fields to be used as destination fields.
CO-3487 Allows data lookup fields to be used as destination fields.
Icon library
![]() CO-3807 Adds the ability to pick custom icon colors.
CO-3807 Adds the ability to pick custom icon colors.
![]()
Read only if
![]() CO-3767 Adds a new conditional action that sets a field as Read only.
CO-3767 Adds a new conditional action that sets a field as Read only.
Read only if: Make the field read only if the condition is met. An example would be setting a from to read only if another field was set to customer. So if you were going to forward a form to a customer, before doing so you could set a field to customer and then set your fields to read only if type was set to customer. You would then forward the form and as a condition of the customer sending the form back the field is reset to technician.
Sketch
![]() CO-3740 Adds a hairline line thickness to the sketch tool.
CO-3740 Adds a hairline line thickness to the sketch tool.
![]() CO-3805 Adds a dashed line option to the sketch tool. Previously only solid lines were available.
CO-3805 Adds a dashed line option to the sketch tool. Previously only solid lines were available.
Video
![]() CO-3627 Increases the video limit to 30Mb
CO-3627 Increases the video limit to 30Mb
Manage mobile app
Settings
![]() CO-3519 Adds a new option to Sent files > Purge schedule: Purge after 1 day. Previously the shortest purge schedule was 3 days.
CO-3519 Adds a new option to Sent files > Purge schedule: Purge after 1 day. Previously the shortest purge schedule was 3 days.